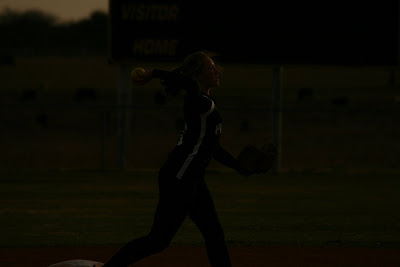
Oops--forgot to change my settings.
Hard to believe isn't it???? Even the color is back. Usually when you have to lighten it as much as I had to, you lose all the black till it fades to gray.
Want to learn how to do it?? If the answer is no, you better leave now because I feel a tutorial coming on....
First, Open the picture in PSE that you want to correct. When you have it opened, look to the right (where the little picture is--the one that says background next to it) Right above that picture is a black and white circle. Click the circle and it will come up with a menu--hit levels. That will create a new level adjustment layer for you. Now, when your level box popped up, in the middle of the box is what looks like some kind of graph. If your picture has perfect levels, then it will look like little black hills. If, your picture looks like mine, it has a big black mountain to the left side--that is bad--very bad. So, in order to fix it, look for the white slider that is attached to the graph--not the one a little below it that looks like a gradient, but the one attached directly to it. Move the white slider(on the right) all the way till it touches the beginning of the black mountain on the right side. You will notice the gray slider moves along with it. Can you see the picture getting lighter??? So, your goal is to have the black slider at the beginning of the black mountain on the left side, your gray slider in the middle, and your white slider on the end of the black mountain on the right side. that will balance out your lighting.
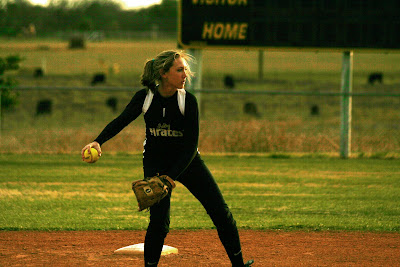
My picture looked like this when I was done with the levels adj.
 To me, it is really, really, yellow and red and really, really grainy.
Soooo, want to learn how to fix that too??? i knew you would. It is so easy you will wonder how you ever got by without it!
First, with your picture already open, click on the same black and white circle you did before but this time when the menu pops up, click on Hue and Saturation. When it pops up, you will see an edit box that says Master and it has a drop down menu. Hit the drop down Menu and you will see it comes up with a list of colors. For the most part, I never touch Red or Magenta because it messes with the skin color but, because this picture is SO yellow and red, we will have to play around with them both. Go to the red first and after you click on red, you will then need to go to the saturation tab. Slide the tab to the left to decrease and right to increase that color. I am going to slide mine to the left and decrease the red tones--just a bit. I don't want to take to much out of it because the field IS a red dirt. When I get it to where I like it, I go back up to the color tab and the drop down menu and pick yellow. I decrease the yellow in my picture to where I like it making sure not to decrease it so much that the softball loses its color. Now, because I can see the grassy field back behind it, I am going to once again click the color tab, go to green, and I am going to increase--by about 20--the color green, This will really make the color pop. Then press OK. You just created a layer mask. Over on the left side of your screen, you now have your background layer and above it will be what looks like a computer and a white rectangle. The great thing about this is that if you start to work with it and later on realize that you want to adjust the color a little more, you can double click on the computer thing and it will pull your menu back up. You can then make your necessary adjustments. YEA!!
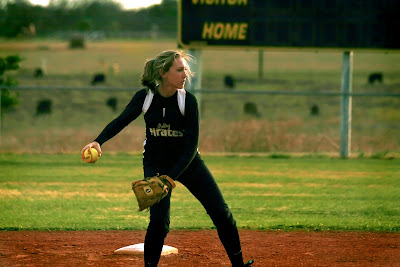
So here it is with the color corrections. Not near as yellow and the red is toned down.
but still too grainy.
So now, I am going to do the best part. For this, you will need to go to this website www.noiseware.com/download.aspx scroll down to the last orange dot and and download the Noiseware Community Edition-Standalone version. It is free and I promise you--you will LOVE it.
Now we are going to get rid of the noise in the picture. Since the noiseware is a stand alone version and not a plug in, you will need to save the picture, minimize PSE and then open your new software. Just click OK when the first window pops up. Go to the Open Folder pic--on the left side and Open your new picture and then go the the spot where it says default and go to the drop down menu. If you have time, you can play around with all of them--just hit undo between tries. I used the nightscene for mine because my pic was so dark. Make sure your preview is ON--it is right next to the default menu. Hit go on the menu (it is to the right of the default menu.) Your picture is fixed. To see the change, click and hold on the picture. You can see the change when you let go. Go to Save as and save your picture.
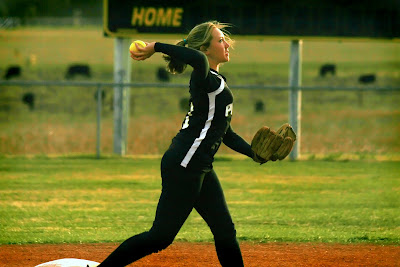
Here is my finished pic.
And that is how you save an unsavable pic.
Now you go try it and let me see what you did!

Wow!! That's great
ReplyDeleteNot that you aren,'t a great teacher. . . but if I have this problem,I will just send it to you to fix :-)